The Ultimate How-To for Sealing Windows with Silicone Sealant
Success in any project begins with the right equipment. Proper tools and materials ensure a professional, durable window seal. Gathering everything beforehand streamlines the process. This preparation prevents interruptions and helps achieve a flawless finish. A well-equipped homeowner is ready for a successful sealing project.
Selecting the Right GP Silicone Sealant
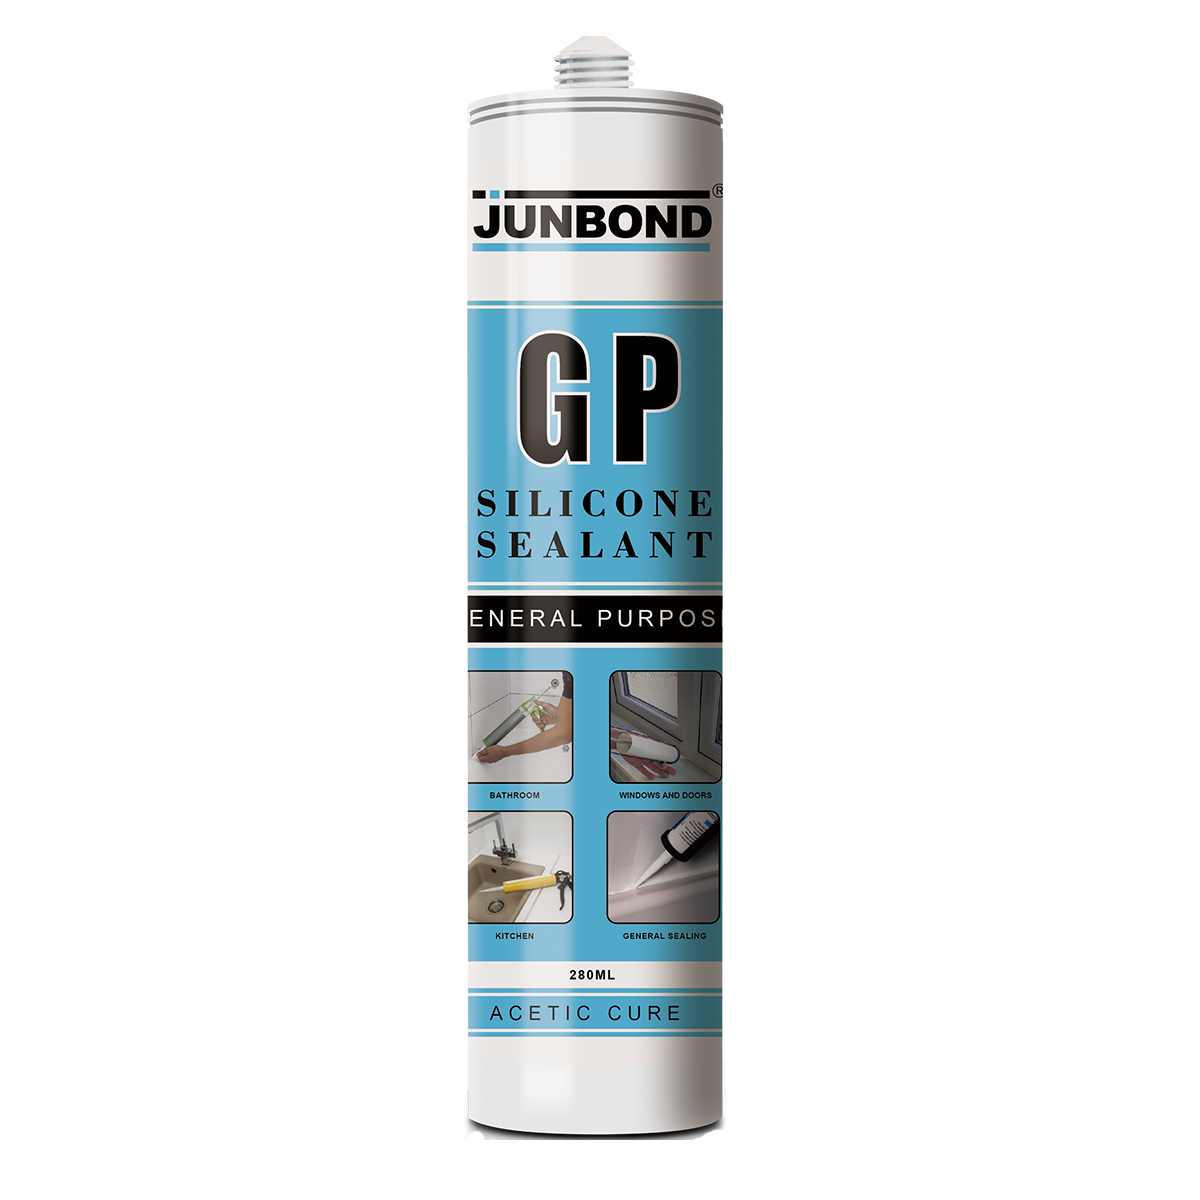
Choosing the correct sealant is critical for a long-lasting bond. A high-performance Gp Silicone Sealant like Junbond® Fast Cured Acidic Silicone Sealant offers an excellent solution. This product provides a flexible, durable seal resistant to weather and UV radiation. Its strong adhesion to materials like glass, aluminum, and wood makes it ideal for windows. The sealant’s impressive ±25% movement capability accommodates structural shifts, preventing cracks and ensuring a reliable, weatherproof barrier for years.
Essential Tools for a Pro Finish
A professional result requires more than just sealant. Homeowners need a specific set of tools for a clean and efficient application.
Tool Checklist:
·Caulk Gun: For applying the sealant smoothly.
·Utility Knife or Caulk Removal Tool: To cut away old, failing sealant.
·Caulking Tool or Spoon: For smoothing the new bead.
·Cleaning Supplies: Isopropyl alcohol and clean, lint-free cloths.
·Trash Bag: For easy disposal of old caulk and materials.
Safety First: Protective Gear
Safety should always be a top priority during any home improvement project. Working with sealants and cleaning agents requires proper protection. Homeowners must wear safety glasses to shield their eyes from debris and chemicals. Nitrile gloves protect the skin from direct contact with the silicone sealant. Ensuring good ventilation in the work area is also crucial, especially when working indoors.
Choosing Your Tools and Materials
Success in any project begins with the right equipment. Proper tools and materials ensure a professional, durable window seal. Gathering everything beforehand streamlines the process. This preparation prevents interruptions and helps achieve a flawless finish. A well-equipped homeowner is ready for a successful sealing project.
Selecting the Right GP Silicone Sealant
Choosing the correct sealant is critical for a long-lasting bond. A high-performance Gp Silicone Sealant like Junbond® Fast Cured Acidic Silicone Sealant offers an excellent solution. This product provides a flexible, durable seal resistant to weather and UV radiation. Its strong adhesion to materials like glass, aluminum, and wood makes it ideal for windows. The sealant’s impressive ±25% movement capability accommodates structural shifts, preventing cracks and ensuring a reliable, weatherproof barrier for years.
Exterior sealants are specifically formulated with UV inhibitors to resist sun damage. They also offer superior temperature tolerance and enhanced moisture resistance. For joints that experience significant movement, a low modulus Gp Silicone Sealant provides greater elasticity, preventing cracks from forming.
Essential Tools for a Pro Finish
A professional result requires more than just sealant. Homeowners need a specific set of tools for a clean and efficient application.
Tool Checklist:
·Caulk Gun: For applying the sealant smoothly. A model with a high thrust ratio (e.g., 18:1) is best for thicker silicones, while a 10:1 ratio works for general use. Look for convenient features like a built-in spout cutter.
·Utility Knife or Caulk Removal Tool: To cut away old, failing sealant.
·Caulking Tool or Spoon: For smoothing the new bead.
·Cleaning Supplies: Isopropyl alcohol and clean, lint-free cloths.
·Trash Bag: For easy disposal of old caulk and materials.
Safety First: Protective Gear
Safety should always be a top priority during any home improvement project. Working with sealants and cleaning agents requires proper protection. Homeowners must wear safety glasses with side shields to protect their eyes from debris and chemicals. Nitrile gloves protect the skin from direct contact with the uncured silicone sealant. Ensuring good ventilation in the work area is also crucial, especially when working indoors. Inhaling fumes from curing sealants can cause headaches or dizziness, so keeping fresh air circulating is essential for a safe environment.
How to Prepare Your Windows for Sealing
Proper preparation is the foundation of a durable, professional-looking window seal. Skipping these crucial steps can lead to poor adhesion, premature failure, and a finish that detracts from your home’s appearance. Taking the time to properly prepare the surface ensures your new Gp Silicone Sealant will bond effectively and provide maximum protection against the elements.
Step 1: Remove Old, Failing Caulk
Before applying a new seal, one must completely remove the old, deteriorating caulk. A clean joint is essential for the new sealant to adhere properly.
1.Soften the Old Caulk: Hardened caulk can be difficult to remove and may damage the window frame if forced. Professionals often soften it first. A heat gun or a standard hairdryer on a low setting can make the material more pliable. Sweep the heat source slowly across the caulk line, being careful not to overheat and warp the frame, especially with vinyl windows.
2.Cut and Scrape: Once softened, use a utility knife or a specialized caulk removal tool to slice through the old bead. Work with slow, deliberate motions to lift the caulk away from the frame. A putty knife held at a low angle is effective for scraping away the bulk of the material. For stubborn remnants, fine-tipped pliers or a razor scraper can be useful.
3.Address Different Materials: The best removal method can depend on the window frame material and the type of old caulk.
Window Frame
Common Caulk Type
Recommended Removal Method
Vinyl
Acrylic Latex
Slice with a utility knife. Use isopropyl alcohol on a rag to soften stubborn residue before scraping.
Aluminum
Butyl Rubber / Acrylic Latex
Warm the caulk with a hairdryer, then carefully remove it with a sharp blade or scraper.
Wood
Acrylic Latex / Silicone
Slice with a knife or scraper. A heat gun can soften very stubborn caulk for easier removal.
A Note on Chemical Removers While chemical caulk removers are available, professionals exercise caution. Some solvents can damage certain surfaces, particularly vinyl. Many experts prefer to avoid solvents altogether to prevent potential harm to the window frame. If considering a chemical remover, always test it on a small, inconspicuous area first to ensure compatibility.
Step 2: Clean the Window Frame Thoroughly
With the old caulk gone, the next step is to create a pristine surface for the new sealant. Any remaining dust, oils, or microscopic debris will interfere with adhesion.
·Initial Debris Removal: Use a stiff-bristled nylon brush to sweep away any loose caulk fragments and dust from the joint. A vacuum with a brush attachment is also highly effective for cleaning out the channel completely.
·Degrease the Surface: Wipe down the entire joint and surrounding frame area with a clean, lint-free cloth dampened with isopropyl alcohol. The alcohol acts as a solvent, cutting through oils, soap scum, and residual adhesives without leaving a film. This step is critical for ensuring the new sealant achieves a powerful bond.
·Final Inspection: Allow the surface to dry completely. Run a finger along the joint to feel for any remaining bumps or residue. The surface should be perfectly smooth, clean, and dry before proceeding to the next step.
Step 3: Apply Painter’s Tape for Crisp Lines
For a truly professional finish, painter’s tape is a tradesperson’s best friend. This step creates sharp, uniform sealant lines and makes cleanup significantly easier.
1.Position the Tape: Apply a strip of high-quality painter’s tape to the window glass, running it parallel to the joint. Place another strip on the window frame, also parallel to the joint.
2.Create the Channel: The space between the two strips of tape will define the final caulk line. Aim for a consistent width of about 1/4 inch (6mm), which is ideal for most window applications.
3.Press Firmly: Press down firmly along the edges of the tape that are closest to the joint. This creates a tight seal and prevents the Gp Silicone Sealant from seeping underneath, ensuring a perfectly crisp edge when the tape is removed.
Applying Your Silicone Sealant Like a Pro
With the window frame prepped and ready, the application phase begins. This is where precision and technique come together to create a perfect, weatherproof seal. A steady hand and the right approach will ensure the sealant performs its job effectively for years to come.
Step 4: Prepare and Load the Caulk Gun
Properly loading the caulk gun is the first step toward a smooth application. This ensures consistent pressure and flow, preventing frustrating stops and starts.
1.Retract the Plunger: Press the thumb release trigger at the back of the caulk gun and pull the plunger rod all the way back.
2.Insert the Cartridge: Place the sealant cartridge into the gun’s frame, seating the bottom end first.
3.Puncture the Inner Seal: The sealant cannot flow until the foil seal inside the nozzle base is broken. A homeowner can use a long, thin screwdriver or a piece of stiff wire for this task. Push the tool down the nozzle until the seal pops. Some caulk guns conveniently feature a built-in seal puncture wire for this purpose.
4.Apply Light Pressure: Gently squeeze the trigger until the plunger makes contact with the back of the cartridge. The gun is now loaded and ready.
Tip: Preventing Unwanted Ooze
Modern caulk guns often include features to prevent sealant from continuing to flow after the trigger is released.
·No drip’ or ‘Auto shut off’ guns automatically relieve pressure, providing the cleanest stop.
·Thumb release triggers require the user to manually release the pressure.
·Even with these features, some sealant formulations can still ooze slightly due to their properties. Always have a paper towel ready.
Step 5: Cut the Nozzle for the Right Bead Size
The size of the sealant bead should match the size of the gap. Cutting the nozzle correctly is crucial for controlling the flow and achieving a neat, effective seal.
A professional always cuts the nozzle at a 45-degree angle. This angled tip allows the user to hold the gun at the proper angle and smooth the bead as it is applied. The cut’s location on the nozzle determines the bead’s width. It is always best to start with a smaller opening; one can always make it larger if needed.
Use this table as a guide for cutting the nozzle:
Gap Size
Nozzle Cut Location
Resulting Bead
Small (1/8″ or less)
Close to the tip
A fine, precise line
Medium (Around 1/4″)
A little farther down
A standard, all-purpose bead
Large (Larger than 3/8″)
Closer to the base
A wide bead for larger gaps
Step 6: Apply a Steady, Continuous Bead
This is the moment of truth. A successful application relies on a smooth, consistent motion.
Start at one corner of the window and hold the caulk gun at a 45-degree angle to the joint. Squeeze the trigger with steady, even pressure to start the flow of the Gp Silicone Sealant. Move the gun smoothly along the joint in a single, continuous motion. The goal is to push a uniform bead of sealant into the gap, not just lay it on top. Maintain a consistent speed to avoid thin spots or thick bulges. When you reach the end of a section, release the trigger and the gun’s pressure mechanism to stop the flow cleanly.
Common Mistakes to Avoid for a Perfect Seal
Even experienced DIYers can make errors. Avoiding these common pitfalls is key to a durable, professional finish.
·Cutting the Nozzle Too Wide: This is a frequent mistake. It wastes sealant, creates a messy bead, and can lead to uneven curing. Always cut the nozzle slightly narrower than the joint.
·Applying in Poor Weather: Extreme cold or high humidity can interfere with the sealant’s ability to cure properly. Check the product’s recommended application temperature and avoid applying if rain or heavy dew is expected.
·Skipping a Backer Rod in Deep Joints: For joints deeper or wider than 1/4 inch, filling the entire space with sealant is wasteful and can cause the seal to fail under stress. A foam backer rod should be inserted first to control the depth.
·Over-Applying the Bead: A thicker bead does not mean a better seal. It can trap air, cure slowly, and look unprofessional. Apply just enough sealant to fill the gap.
The Finishing Touches for a Flawless Look
Applying the sealant is only part of the job. The final steps ensure a durable, professional-looking seal that is both functional and aesthetically pleasing. These finishing touches are what separate an amateur attempt from a flawless, long-lasting result.
Step 7: Tool the Sealant Bead
Tooling is the process of smoothing the applied sealant bead. This action forces the sealant into the joint for a stronger bond and creates a clean, concave profile.
A homeowner can use a specialized caulking tool or a fingertip for this task. Dip the tool or finger in a mild soap-and-water solution to prevent the sealant from sticking. Then, run the tool along the joint at a 45-degree angle, applying light, consistent pressure. This smooths the bead and removes any excess material, leaving a perfect finish. One should avoid overworking the sealant to maintain the integrity of the bond.
Step 8: Remove the Painter’s Tape
Proper timing is critical when removing the painter’s tape. This step must be done while the sealant is still wet. Waiting too long can cause the forming skin of the sealant to tear, ruining the clean edge.
Professionals remove the tape during the “skin formation” phase. This period typically occurs within a few minutes to an hour after application. Pull the tape away from the sealant bead at a 45-degree angle. A slow, steady motion will lift the tape cleanly, revealing a sharp, perfect line.
Step 9: Let It Cure Completely
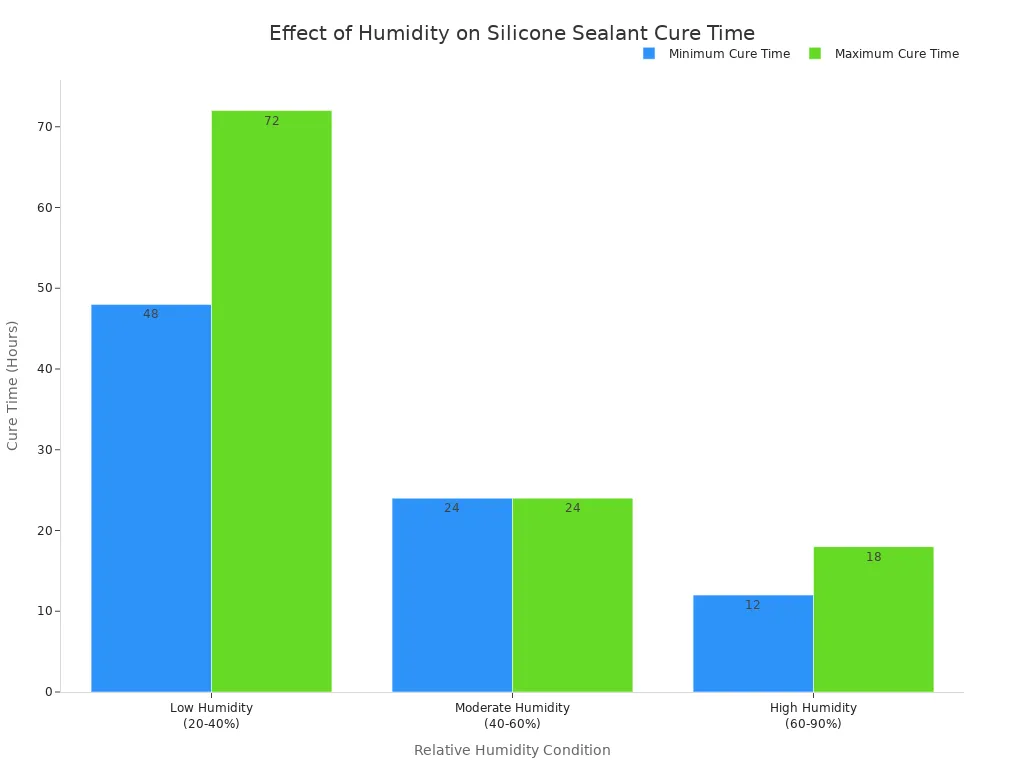
The final step is patience. The Gp Silicone Sealant must cure completely to achieve its full strength and flexibility. A standard silicone sealant typically cures in 24-48 hours under ideal conditions of 20-25°C (68-77°F) and 40-60% humidity.
Curing Factors at a Glance The environment plays a major role in how quickly your sealant cures. Higher temperatures and humidity accelerate the process.
Condition
Relative Humidity (%)
Typical Cure Speed
Low Humidity (Dry)
20–40%
Slow (48–72 hours)
Moderate Humidity
40–60%
Normal (24 hours)
High Humidity
60–90%
Fast (12–18 hours)
During this time, avoid touching the sealant or exposing it to water. Good ventilation helps the curing process by allowing moisture in the air to react with the silicone. Once fully cured, the seal is ready to protect the window for years.
Maintaining Your New Window Seal
A successful sealing project does not end with the final cure. Proper maintenance ensures the seal’s longevity and performance. Homeowners can protect their investment with simple cleaning and regular inspections. This proactive approach preserves the window’s energy efficiency and weatherproof barrier for years.
How to Clean Your Sealed Windows
Routine cleaning keeps the new Gp Silicone Sealant looking pristine and prevents the buildup of dirt or mildew. One should always use gentle, non-abrasive methods to avoid damaging the seal’s surface.
For General Upkeep: A mixture of warm water and a few drops of mild dish soap is highly effective. A homeowner can apply the solution with a soft cloth, gently wipe the sealant, and then rinse the area. Drying with a microfiber towel prevents water spots.
For Soap Scum or Light Mildew: A paste made from equal parts white vinegar and baking soda works well. Apply the paste to the sealant and let it sit for about 20 minutes. Gently scrub with a soft brush before rinsing thoroughly.
For Stubborn Stains: A paste of hydrogen peroxide and baking soda can lift tough stains. Apply it to the affected area, wait 30 minutes, and then scrub lightly with a soft toothbrush before rinsing.
When to Inspect and Reseal
Regular inspections help identify potential issues before they lead to significant damage. Professionals recommend examining window seals at least once a year, typically in the spring or fall. A high-quality, professionally applied seal can last over 20 years, but environmental factors can influence its lifespan.
Pro Tip The most obvious sign of a broken window seal is moisture trapped between the glass panes. This fogginess cannot be wiped away from either side and often appears in the corners first.
Homeowners should look for clear signs of failure that indicate a reseal is necessary:
Condensation Between Panes: Fog or water droplets appear between the layers of glass.
Visible Mold or Staining: Dark spots or discoloration form along the edges of the seal.
Cracking or Peeling: The sealant is visibly pulling away from the frame or glass.
Distorted Windowpanes: The glass itself appears warped or uneven, suggesting a loss of pressure.
A homeowner now possesses sealed, weatherproof, and energy-efficient windows. This successful project immediately enhances home comfort and reduces energy costs. Regular annual inspections are the key to maintaining this protective barrier for years to come.
Homeowners can now enjoy the profound peace of mind that a secure, well-maintained home provides. This simple DIY task delivers lasting value and protection.
FAQ
Can I use this sealant for both interior and exterior windows?
Yes, a versatile product like Junbond® Fast Cured Acidic Silicone Sealant is designed for both. Its formula provides excellent weather durability and UV resistance. This makes it a reliable choice for sealing windows inside and outside the home, ensuring a consistent, long-lasting protective barrier against the elements.
How long do I have to tool the sealant before it skins over?
A homeowner has a limited window of time for tooling. Most silicone sealants begin to “skin over” within 5 to 10 minutes of application. One must tool the bead immediately after applying it to a section to ensure a smooth finish and proper adhesion before this skin forms.
What happens if I apply sealant in cold weather?
Applying sealant below its recommended temperature can cause problems. Cold weather significantly slows the curing process. The sealant may also fail to adhere properly to the cold window frame.
Pro Tip Always check the product label. Junbond® sealant, for example, performs best when applied in temperatures between 5°C and 45°C (41°F and 113°F).
Is it possible to paint over this silicone sealant?
Most pure silicone sealants, including acetoxy-cure types, are not paintable. Paint does not adhere well to the sealant’s slick, flexible surface and will quickly peel or flake off. A homeowner should choose a sealant color that matches the window frame to achieve the desired final look.